I continue my examination of the last U.S. Women's Championship - after something of a break - with the round 6 game between Sabina Foisor and Megan Lee. Foisor managed to have two Whites in a row and opened the same way both times for the first three moves. However, instead of again heading for a "Slow Slav" by transposition as in round 5, she chooses to continue with a Colle System setup. The opening seems a bit of a mishmash, as it's not a true Colle-Zukertort, and Black has some chances to play more aggressively in Stonewall fashion. However, by move 10 White has achieved a pleasant game against a more cramped-looking Black.
The early middlegame transition is where White begins going wrong, ending up more cramped for space herself and then allowing an interesting if not quite decisive tactic by Black on move 17, that gives Black the initiatve. By around move 25 White has re-established equality, but Black signals with her move choices that she is not interested in heading for a draw. It's worth following how through stubbornness and rearrangement of her pieces, Lee finally ends up in a classic and decisive Dutch-type attack on the kingside.
[Event "U.S. Women's Chess Championship 2022"]
[Site "Chess.com"]
[Date "2022.10.11"]
[Round "06"]
[White "Foisor, Sabina-Francesca"]
[Black "Lee, Megan"]
[Result "0-1"]
[WhiteElo "2203"]
[BlackElo "2226"]
[EventDate "????.??.??"]
[ECO "D04"]
[PlyCount "142"]
[Annotator "ChessAdmin/Dragon 3.2"]
[TimeControl "5400+30"]
1.d4 d5 2.Nf3 Nf6 3.e3 {Colle System} 3...c6 4.Bd3 e6 {the second most popular move in the database, but not nearly as effective as ...Bg4 in countering White's basic plans in this opening setup.} 5.b3 {this move is emblematic of the Colle-Zukertort variation; however, it is normally played when Black has gone ...c5.} 5...Nbd7 6.Bb2 Bb4+ {played to provoke White's next move, but it is not obligatory.} ( 6...Ne4 $5 {now Black could seize some space and play like a Dutch Stonewall following ...f5. Taking the knight is not a great option for White.} 7.Bxe4 dxe4 8.Ne5 Bb4+ 9.c3 Nxe5 10.dxe5 Qxd1+ 11.Kxd1 Be7 $10 ) 7.c3 ( 7.Nbd2 $5 Ne4 8.a3 $14 ) 7...Bd6 8.c4 {although this double pawn advance seems a bit contradictory, it actually appears best, as Black would simply lose a tempo by moving the bishop back to b4.} 8...Ne4 {although this is a key idea for Black in this formation, both the database and the engine indicate that it might be better played earlier, on move 6. Now it moves an already-developed piece twice.} 9.O-O {nowhere else to put the king, so might as well castle now.} 9...O-O {this gives White a number of pleasant alternatives, but there does not appear to be anything better.} ( 9...f5 {going for a Stonewall formation would be the logical follow-up to ...Ne4. However, this scores poorly in the database and is very committal.} ) 10.Ne5 ( 10.Nc3 $5 {scores even better in the database and is a less committal option for White.} ) 10...f6 11.Nxd7 {probably best, so as not to lose a tempo by retreating, although there is the trade-off of making Black a little less cramped overall after the pieces are removed.} 11...Bxd7 12.f3 {symmetrically kicking Black's knight now, which will be awkwardly placed.} 12...Ng5 13.Nd2 {this appears to be an inferior square for the knight. Going to c3 instead would indirectly restrain ...e5, due to cxd5, although there are some tactics to think about.} ( 13.Nc3 $5 f5 ( 13...e5 $6 14.cxd5 exd4 15.exd4 Qc7 16.h4 Rae8 17.Kh1 ( 17.hxg5 $2 Bh2+ 18.Kh1 Qg3 $19 ) 17...Qd8 18.Qd2 $14 ( 18.hxg5 $6 fxg5 {and it looks like Black and look for a rook (or queen) lift to the h-file and try for a perpetual check.} ) ) 14.Qd2 $14 {with the idea of Ne2-f4 as a follow-up, also enabling play for the rooks.} ) 13...f5 {If Black was planning to play this way, it seems like making this move earlier would have been better, although it is not bad. The f6 pawn would instead seem better placed to support play in the center, specifically the e-pawn lever.} ( 13...e5 ) 14.Qe2 $10 {White has the problem of where to put her queen, as no square is particularly good, and is somewhat cramped.} 14...Be8 {a classic idea in the Stonewall formation. The bishop will do nicely one repositioned.} 15.e4 {White understandably looks to free up some space, but this may have been premature.} 15...Bh5 {the logical follow-up, although it might be better to anticipate White's next.} ( 15...Bb4 $5 {immediately pressures the Nd2, which is a key tactical point. White does not have time to simply kick it away.} 16.a3 $6 ( 16.Rad1 $10 ) 16...Nh3+ 17.Kh1 Qg5 18.gxh3 ( 18.axb4 $2 Nf4 19.Qf2 Nxd3 $19 ) 18...Bxd2 $15 ) 16.e5 Bb4 17.a3 $6 {this allows tactical ideas based on the Nd2 being under-protected, similar to the above variations.} ( 17.Rad1 ) 17...Nh3+ $1 {the key idea. White is still all right, but Black certainly has the initiative now.} 18.Kh1 ( 18.gxh3 $2 Qg5+ 19.Kh1 Bxd2 20.Bc1 Bxc1 21.Raxc1 dxc4 22.Bxc4 Qe7 $17 {and Black will have a much better game, targeting the weak White pawns.} ) 18...Nf4 19.Qe3 {forced, to protect the Bd3.} 19...Bxd2 {this piece liquidation ends up being even, but it helps White un-cramp her position.} ( 19...Nxd3 $5 20.Qxd3 Be7 {would preserve the two bishops, at least temporarily, and keep White a little more cramped.} ) 20.Qxd2 Nxd3 21.Qxd3 {now things look very even again.} 21...f4 {gaining some space and a better diagonal for the light-squre bishop, but also putting the pawn farther from its support.} 22.a4 {opening the a3 square for the bishop and restraining ...b5.} 22...Bg6 23.Qd2 {the logical square, pressuring f4 and allowing the queen to be mobile on the 2nd rank .} 23...Qh4 {committing the queen to the kingside. This move also overprotects the f-pawn.} 24.Qf2 Qh6 {indicating Black wants to play for a win, rather than exchange. However, she does not have any real threats and the queen is not very effective on h6, so White could take advantage of this.} 25.cxd5 ( 25.Ba3 $5 {seems logical, with the potential transfer of the bishop to the d6 square.} ) 25...exd5 {Black continues to try to unbalance the game in seeking a win, but again White could take even more advantage. However, the engine move may not have even been contemplated, since it detaches the e-pawn from its support.} ( 25...cxd5 26.Rac1 Rfc8 $10 ) 26.Bc1 {a passive place for the bishop, but equal.} ( 26.e6 $1 {the idea is that the pawn can get to e7 and cannot be dislodged, putting Black under pressure and giving White a measurable advantage.For example} 26...Bf5 27.e7 Rf6 28.Rfe1 Re8 29.Ba3 $16 {with the idea of Re5 and also the potential for play on the queenside with a4-a5 and Bc5.} ) ( 26.Ba3 {again is a good idea, although after ...Rfe8 Black is still all right.} ) 26...Rae8 {restraining the e-pawn.} 27.a5 {this is less effective with the bishop on c1 instead of a3.} 27...Bd3 {while the position is equal, Black again has some initiative due to White's passivity.} 28.Rg1 Qh5 {the point here is that h6 is cleared for a rook lift.} 29.Re1 {White does not appear to have any ideas for progress, since the rook of course could have come to e1 the prior move.} 29...Re6 30.Ra2 Rf5 {Black continues with piece play. However, we now have a Dutch-looking structure in which the natural move would be to grab space on the kingside.} ( 30...g5 $5 ) 31.Rd2 Bb5 {although Black's pieces are clearly more active, there is still no way to make progress. White can play for a fortress by simply moving her rook to c2, for example.} 32.Qg1 $6 {this actually weakens White's defensive structure, by making the queen a potential target and giving up control of the e1-h4 diagonal.} 32...Qf7 33.Rf2 Rg6 {choosing to line up against the queen on the g-file rather than the king on the h-file. However, Black does not have much in the way of follow-up threats.} ( 33...Rh5 $5 {would appear to be a more consistent with the queen retreat, allowing for ...Rh4 as a follow-up while pressuring the h-file, for example by putting the queen back on h5.} ) 34.h3 Kf8 {this doesn't seem like a necessary idea, but then again there is no evident way to make progress.} 35.Ba3+ Ke8 36.Rd2 $2 {White further cramps her position and now Black is able to obtain a winning advantage by rearranging her own pieces for a kingside attack.} ( 36.e6 $5 {again the Dragon engine spots this idea, which seems counter-intuitive.} 36...Rxe6 {the pawn sacrifice is good for dynamic equality, as Black having brought her king to the center made it a target along the e-file. For example} 37.Rc2 Rf6 38.Rcc1 $10 {preparing to reload on the e-file after an exchange of rooks} ) ( 36.Ra1 {looks safe and allows for the the queen to become more active via Qc1 and then transferring to c5.} ) 36...Qe6 {this blocks the e-pawn and lines up on h3.} 37.Qh2 {White continues with her static defense.} 37...Rg3 $1 {now there is nothing White can do to stop Black's buildup.} 38.Bc1 Rh5 39.Ra2 g5 {Black finally gets the g-pawn into the action.} 40.Bd2 Bd3 {following the rule of bringing all the pieces into the attack.} 41.a6 {a sacrificial distraction. Black would do best to not retreat the bishop and continue the attack, but is still winning after snatching the pawn.} 41...Bxa6 ( 41...b6 {and now ...Bf5 is threatened, with White having no counterplay.} ) 42.Rc1 {clearing e1 for the bishop. Black could simply proceed with taking on h3 now, although the text move is still fine.} 42...Qf5 ( 42...Rgxh3 43.gxh3 Rxh3 44.Bb4 Rxh2+ 45.Rxh2 Qf5 $19 {Black is winning handily with the extra pawns, but perhaps she did not want to deal with the queen versus two rooks dynamics.} ) 43.Be1 Rgxh3 44.gxh3 Rxh3 45.Rxa6 {a desperate bid for counterplay by opening the c-file.} 45...Rxh2+ 46.Kxh2 bxa6 47.Rxc6 $19 {at the end of the sequence Black is materially up by a winning amount, but still has some cleaning up to do. The power of the queen is nicely demonstrated.} 47...Qd3 ( 47...g4 $5 {would be more forcing and get rid of the last shred of a pawn shield for White.} ) 48.Kg2 Qxd4 {Black takes her time and keeps the win in hand, rather than worrying about playing the absolute best move. This is an excellent strategy in the endgame.} 49.e6 Qb2+ 50.Bf2 d4 {passed pawns must be pushed! This also completely cuts off the Bf2 from the action, prompting White to in effect exchange the e- and d-pawns, which also results in the rest of the queenside pawns disappearing. The simplification does not help White, however.} 51.Rd6 Ke7 52.Rxd4 Kxe6 53.Ra4 Qxb3 54.Rxa6+ Ke5 55.Rxa7 Qd3 {calmly centralizing the queen and protecting h7.} 56.Ra5+ Kf6 57.Ra4 h5 {passed pawns must be pushed!} 58.Rd4 Qa3 {controlling d6 to prevent a rook check.} 59.Rc4 h4 60.Bd4+ Ke6 {it is a sign of Black's dominance that the king is just fine alone in the center, with the queen also on the board.} 61.Rc3 Qa2+ 62.Kh3 {forced, to stop the further advance of the h-pawn.} 62...Qe2 ( 62...Qd5 {would be more forcing.} ) 63.Ra3 ( 63.Rc6+ Kd5 $19 ) 63...Qf1+ {further tightening the noose around White's king and forcing it off the blockading square.} 64.Kh2 h3 65.Ra2 Qxf3 {the position is now obviously resignable, but White makes her work for it.} 66.Rf2 Qd3 {kicking the bishop.} 67.Ba7 Kf5 {showing the utility of the king in the endgame, supporting the pawns and the attack.} 68.Kh1 g4 69.Kg1 g3 70.Rf1 h2+ 71.Kg2 Qxf1+ {Black takes the simplest route and White finally resigns.} 0-
 |
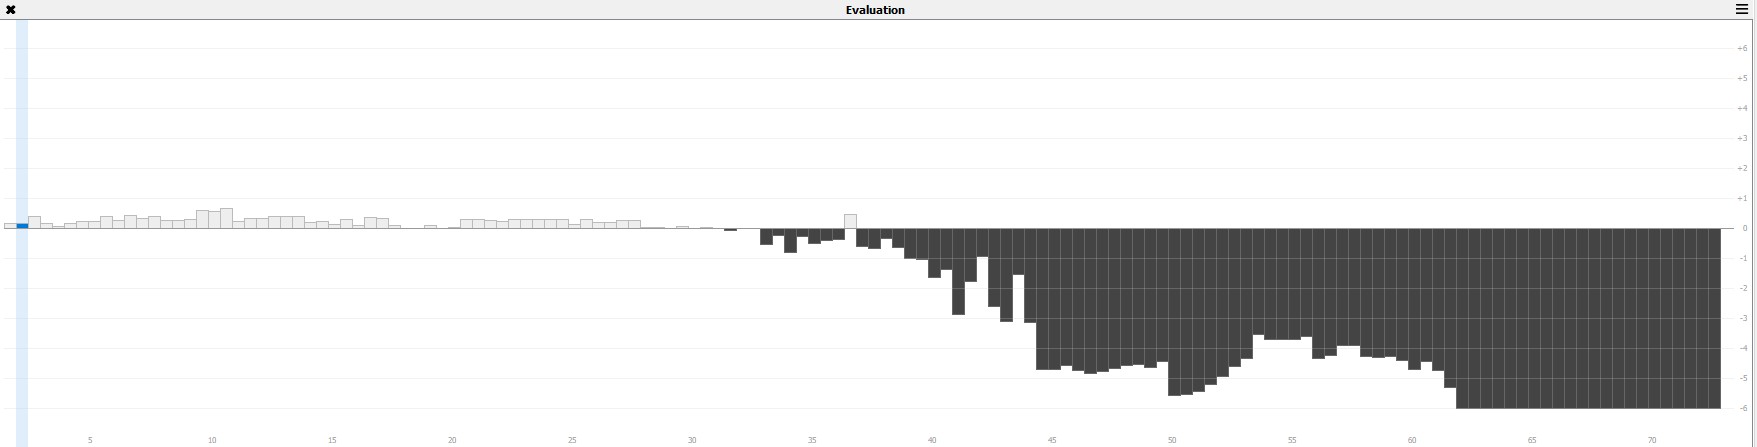
| Evaluation chart generated by HIARCS Chess Explorer Pro |