27 March 2022

Commentary: U.S. Women's Championship 2021, Round 3 (Abrahamyan - Zatonskih)

Following two previous losses in rounds 1 and 2 (an "0-0" result, also known as "castling short") in the 2021 U.S. Women's Championship, WGM Tatev Abrahamyan in the third round scored for the first time against one of the strongest players in the field, veteran IM Anna Zatonskih. While Abrahamyan must have been desperate for a win at this point, as White she did not choose an aggressive opening, instead going into a positional double-fianchetto Reti. 

Some strong players have followed this kind of strategy for a long time - see Kasparov's must-win victory in the English over Karpov - and it is also a very current approach, thanks to its successful use by world champion GM Magnus Carlsen. The idea is to reach positions where you can "just play chess" and outplay your opponent, rather than trying to overpower them with deep preparation or tactical wizardry; at the top levels, that is rarely possible, in any event. In this particular case, Abrahamyan may also have wanted a calmer approach to start, given the grueling previous two rounds.

Abrahamyan's first aggressive choice comes on move 12, when she chooses a disruptive move in the center to directly challenge Black's forces. Instead of closing the center in response, Zatonskih exchanges on e4 and gives White a freer game, which is evidently what Abrahamyan wanted. However, White's pieces start getting tangled and by move 22 Black has a nice position. However, Black does not have a knockout plan and decides on move 23 to avoid a bishop exchange, which is significant strategic decision. White manages to untangle her pieces, then take the initiative by planting a knight on d5 - important psychologically, even if in an objectively equal position. Although White chooses to exchange the knight, d5 is later occupied by a rook and the exchange results in a winning position, with a final tactical flourish.

Credit goes to Abrahamyan for not buckling under Black's small but real positional pressure and advantage - illustrated at the bottom by the the HIARCS Chess Explorer Pro "Evaluation Explorer" chart - while finding ways to make herself more active and eventually target Black's weaknesses (for example the a-pawn). It's also worth noting the game highlights a number of themes mentioned in "The fundamental importance of the relative value of pieces" post, especially regarding piece exchanges.

[Event "U.S. Women's Chess Championship 2021"] [Site "http://www.chessbomb.com"] [Date "2021.10.08"] [Round "03"] [White "Abrahamyan, Tatev"] [Black "Zatonskih, Anna"] [Result "1-0"] [WhiteElo "2344"] [BlackElo "2422"] [EventDate "????.??.??"] [ECO "A11"] [PlyCount "93"] [Annotator "ChessAdmin/Dragon by Komodo 2.6.1"] [BlackClock "0:15:00"] [BlackFideId "14101572"] [TimeControl "5400+30"] [WhiteClock "0:11:47"] [WhiteFideId "13301918"] 1.Nf3 Nf6 2.g3 {going into the King's Indian Attack formation.} 2...d5 3.Bg2 g6 {Black chooses a more symmetrical formation for her bishop development, although she has already staked out territory in the center with ...d5.} 4.b3 {choosing a double fianchetto approach and waiting to challenge in the center.} 4...Bg7 5.Bb2 O-O 6.O-O a5 $5 {this is very commital with the a-pawn and of course does nothing directly for Black's development. By following the usual rule of thumb by reacting in the center to a wing advance, White may gain a slight advantage, or at least an easier game.} 7.c4 c6 {logically reinforcing d5 and blunting the White bishop on the long diagonal. However, it makes ...a5 look even more out of place.} ( 7...dxc4 $6 {this might look attractive at the amateur level to some players, but positionally White would effectively gain a central pawn. Also, the half-open b-file is likely a strength, while White's isolated a-pawn can't effectively be targeted by Black.} 8.bxc4 $14 ) 8.d3 {again choosing a more restrained approach toward development, keeping options open in the center. The main point is that the Nb1 will go to d2 rather than c3.} 8...Re8 {here ...a4 or ...Na6 are much more common in the database, which is to be expected, since they are consistent with the ideas behind the earlier ...a5 advance. However, the text move scores significantly better.} 9.Nbd2 ( 9.Qc2 $5 {is preferred by the engine and scores much better in the database as well, although the text move is more common. White waits to commit the knight and with the queen move clears the d1 square for a rook, protects the Bb2, and exerts more control over e4, while also establishing a presence on the c-file.} ) 9...Nbd7 10.Rc1 {improving the rook and completing White's development. Black now plays the logical follow-up to previous moves, seizing space in the center.} 10...e5 11.cxd5 {this is almost obligatory, as otherwise Black can get an even stronger center. It also opens up the file for the Rc1.} ( 11.e3 {would keep the tension in the center, but Black has more space and better prospects.} ) 11...cxd5 {recapturing with the Nf6 would reduce the central pawn presence and give White a nice knight outpost on c4.} 12.e4 ( 12.Rc2 {would be a more conventional and less commital choice, with a slow buildup on the c-file possible.} ) 12...dxe4 {Black reacts by giving White the type of game she evidently wants, rather than closing the center.} ( 12...d4 {the advanced pawn cramps White, although not decisively after Nc4.} ) 13.dxe4 b5 {taking away the c4 square from White's knight and gaining space.} 14.Qc2 {overprotecting e4 and projecting power down the c-file.} 14...Ba6 {clearing the c8 square for a rook, while also developing to a good diagonal.} 15.h3 {while this takes away the g4 square from the Nf6, this seems like more of a strategic waiting move.} 15...Bh6 {pinning the Nd2 and getting the bishop to a more active diagonal.} 16.Qb1 $6 {this allows Black's queen to develop effectively.} ( 16.Rfd1 $5 {and now if} 16...Qb6 17.Qc7 ) 16...Qb6 17.Rcd1 {White now fully abandons the c-file, which seems unfortunate. However, Black does not react strongly to it.} 17...Nh5 ( 17...Rad8 {would develop the rook to a useful file, collectively making Black's pieces more stronger than White's; for example ..Nc5 would be a strong follow-up.} ) 18.Rfe1 {clearing the square for the knight to be redeveloped.} 18...Rad8 19.Nf1 {White improves her worst piece.} 19...b4 20.Ne3 {an immediate logical follow-up, but this was not necessarily urgent. The engine suggests Qa1 or Rd5 as other possibilities.} 20...Bxe3 {Black profitably exchanges her bad bishop for good knight.} 21.Rxe3 f6 {this logically reinforces e5 and makes White's pressure on the pawn irrelevant, freeing up Black's pieces from protecting it. However, it takes away a maneuver square for the Black knights.} ( 21...Nxg3 $5 {is an interesting tactical possibility. The point is that the knight cannot be captured by the f-pawn, which would leave the Re3 hanging.} 22.Nxe5 Nxe5 23.Rxg3 Rxd1+ 24.Qxd1 f6 $10 ) 22.Nd2 $6 {this avoids the ...Nxg3 threat, since the Re3 now protects the g-pawn, but White's pieces are placed awkwardly and the Nd2 interferes with the Rd1. Black now exploits this.} ( 22.Nh2 ) 22...Nc5 23.Bf1 {needed to cover the d3 square.} 23...Bb7 {an important strategic decision, done to avoid exchanging bishops. Black may have felt that keeping the pressure on was more important. However, e4 is overprotected and now White's knight goes to a powerful square.} ( 23...Bxf1 24.Nxf1 $15 ) 24.Nc4 Qc7 25.Bg2 {logically reinforcing e4, since d3 no longer needs to be covered.} ( 25.g4 $5 {is the engine's suggestion, which leads to much more aggressive and tactical play.} 25...Nf4 26.g5 fxg5 27.Bxe5 Rxd1 28.Qxd1 Rxe5 29.Nxe5 Qxe5 30.Qd8+ Kg7 31.Qxa5 {is one line.} ) 25...Ng7 {a good idea to redeploy the knight, but perhaps a little premature.} ( 25...Rxd1+ {this is a recurring idea, swapping rooks and getting Black's remaining rook to a good post on d8.} 26.Qxd1 Rd8 27.Qc2 Ng7 ) 26.Ree1 {White now has managed to untangle her pieces and is at parity with her opponent. Black now must try to find a useful plan.} 26...Nge6 27.Ne3 {although the knight looks good on c4, it will be even better on d5. Black has to think about how to cover f6 now.} 27...Qf7 $6 {this unnecessarily defensive move seriously reduces the scope of Black's queen.} ( 27...Ng5 {the engine's alternative, but certainly not an obvious one for a human. The point being} 28.Nd5 Qf7 {and now White has to protect the e-pawn with f3, otherwise for example} 29.h4 ( 29.f3 Bxd5 30.exd5 Rxd5 {is at least equal for Black.} ) 29...Ngxe4 30.Bxe4 Nxe4 31.Qxe4 Bxd5 $19 ) 28.Qc2 Ba6 $6 {this actually moves the bishop away from the most important action.} ( 28...Rc8 ) 29.Nd5 $14 {White may only have a slight plus objectively, but now she has the initiative for the first time.} 29...Rc8 30.Qb1 {getting the queen away from the line of fire of the Rc8.} 30...Nc7 {Black needs to challenge the dominant Nd5.} 31.Nxc7 {here the engine assesses that it's better for White to maintain the knight on d5, but she may well have worried about maintaining an isolated d-pawn after an exchange.} ( 31.h4 Nxd5 32.exd5 Red8 {leads to complicated play, with the engine showing a slight plus for White.} ) 31...Rxc7 32.Bc1 {looking to redeploy to a more active diagonal.} 32...Ne6 $6 {this in fact appears to be a less effective square for the knight.} ( 32...a4 {is the active plan suggested by the engine.} 33.bxa4 Nxa4 {threatening ...Nc3.} ) 33.Be3 Rd7 34.Rd5 {once again White benefits by seizing the d5 square, this time evaluating that a trade will be quite beneficial. Black fails to see this, however.} 34...Rxd5 $6 ( 34...Nd4 {played first is the engine's solution.} 35.Bxd4 exd4 36.Rxa5 Qe6 {and Black is down a pawn, but has compensation in the form of the mobile passed d-pawn and active pieces.} ) 35.exd5 Nd4 36.Qd1 {simply threatening to win a pawn by exchanging on d4.} 36...Nb5 37.Bb6 $16 {and now White targets the weakness created by Black's advanced a-pawn.} 37...Nc3 38.Qd2 Bb7 {unfortunately for Black, the passed d-pawn is mobile and White controls the queening square.} 39.d6 Bxg2 40.d7 $1 ( 40.Kxg2 $4 Qb7+ $19 ) 40...Bxh3 41.dxe8=Q+ ( 41.d8=Q $5 Rxd8 42.Qxd8+ Kg7 43.Bxa5 Qb7 44.Qc7+ $16 ) 41...Qxe8 42.Kh2 Be6 43.Bxa5 {now Black simply does not have compensation for the material, as White's rook will be quite effective in the endgame. As often occurs with a major shift in game evaluation, the player on the downward trend collapses.} 43...Bd5 $2 {now White has a tactical finish, due to the inadequate protection of the bishop.} ( 43...g5 {and the best White has is to exchange queens and grind it out.} 44.Qd8 Qxd8 45.Bxd8 Kf7 46.Ra1 ) 44.Bxb4 g5 {hoping to trick White with a false sacrifice. The point of the text move is that it now gives Black the possibility of ...Qh5.} 45.g4 $1 {this covers h5 and ends Black's tactical hopes.} 45...Qg6 46.Qxc3 Qh6+ 47.Qh3 1-0


26 March 2022

The fundamental importance of the relative value of the pieces

From Quora article "What are the values of each piece in chess?"

NM Dana Mackenzie's recent post "There's No Such Thing as an Even Exchange" - well worth the read - highlighted from a chess trainer's point of view the importance of evaluating all potential piece exchanges on their own merits. From time to time I've also mentioned this idea, which I assess is one of the major differences between master-level and amateur-level players. Below I'll gather together some related concepts and situations, which all reflect a core characteristic of master-level chess: the players recognize the fundamental importance of the relative, not absolute, value of the pieces.

Unfortunately the numeric "piece value" chart everyone learns as a beginner, reproduced at the top of this post, is...a lie. Like most beginner's concepts, it is quite helpful in the early stages of learning chess skill and playing opponents of similar skill. Once you get closer to the threshold of mastery, however, such concepts will have to be un-learned in order to make further progress. The problem is not that the beginner's rules aren't helpful. However, they are approximations and guidelines at best - only the actual situation on the board is real.

Chess strategy and tactics in fact depend on the relative value of the pieces. This is true in both a static sense (the current position's evaluation) and in a more dynamic evaluation, which takes into account the future potential of each piece. Tactical play involving sacrifices is the most obvious illustration of the idea of relative value, since by definition more material is given up during a sequence than it should be "worth". This is because the player initiating the tactical sequence calculates (rightly or wrongly) that the position at the end will be more favorable to them.

This type of tactical play ranges from forced mates, in which the amount of material sacrificed is truly irrelevant to the final result, to positional sacrifices where one person - perhaps even the strategic defender, not attacker - gives up material to reach an improved position. The latter case can be seen in a number of endgames where the defender finds a tactic to reach a fortress-type position with a sacrifice, or can simply leave the attacker with insufficient material to win.

In the absence of tactics on the board, maximizing the relative value of your pieces becomes the route to strategic victory - which of course can, in the process, produce new tactical opportunities. The primary goal here is to enhance the scope of your pieces (and pawns). This is directly and mathematically reflected by how many squares they influence. A corollary to this is how important those squares are. Naturally, being able to dominate the ones around your enemy's king is very valuable. For pawns the importance of the squares they can influence is especially significant, since once advanced, they can never again control the squares behind them.

The combination of the scope and importance of squares influenced by each side's pieces is therefore what drives specific positional situations and evaluations. Just a few examples: "good" knight vs. "bad" bishop; the value of a rook on the 7th and 8th ranks, or on open files; bishops on an open long diagonal; the strength of a centralized queen in an open position. Naturally the list could continue, but the point is that these should not be considered as special positional cases to be memorized; rather, they reflect the relative value of the pieces in each case.

For improving players, this then brings up the question of how to get better at making these relative evaluations and related decisions. When is trading bishop for knight a good idea? Should I simplify down material in an endgame? What about those mysterious-looking exchange sacrifices that masters make, without a forced win on the board?

Making a regular practice of reviewing annotated master-level games, ideally with the thinking process explained by one of the players involved, I have found to be the best method. Piece exchanges and other factors that directly involve the relative value of the pieces are then explained in the context of a specific board situation. The linked post at the top is a good example of this.

Some other particularly relevant examples from this blog:

13 March 2022

Commentary: U.S. Women's Championship 2021, Round 2 (Yip - Abrahamyan)

This commentary game from the second round of the U.S. Women's Championship also (by chance) features WGM Tatev Abrahamyan on the losing side, this time as Black. However, once again she played in the most interesting game of the round for me, featuring the fun Milner-Barry Gambit in the French. Her opponent was much stronger than in the first round - being IM Carissa Yip, the eventual tournament winner - and the clash between them was of a very different nature.

As is usual with gambits, the game was full of dynamic tension, with White having full compensation for the pawn due to Black's poorer development and worse piece placement. An easier strategic game is also often a benefit for the gambiteer, even if more of a psychological one. Here, Black (Abrahamyan) does not have a good strategic plan available, and is essentially baited by Yip into making a fatal mistake by allowing tactics to appear on the board for White. From there, it is a matter of White reducing material while not allowing counterplay, and elegantly using a tactic to transition to a clearly won position. A fine win by Yip and another frustrating game for Abrahamyan. Hopefully I'll find a good win of hers for later in this series...

Below the game replayer I've included a snapshot of the HIARCS Chess Explorer "Evaluation Explorer" for the game. Based on previous discussions, I think I'll do that for all of the games going forward, as it adds a further dimension to understanding both the objective and subjective game dynamics.


[Event "U.S. Women's Chess Championship 2021"] [Site "http://www.chessbomb.com"] [Date "2021.10.07"] [Round "02"] [White "Yip, Carissa"] [Black "Abrahamyan, Tatev"] [Result "1-0"] [WhiteElo "2402"] [BlackElo "2344"] [EventDate "????.??.??"] [ECO "C02"] [PlyCount "65"] [Annotator "ChessAdmin/Dragon by Komodo 2.6.1"] [BlackClock "0:01:05"] [BlackFideId "13301918"] [TimeControl "5400+30"] [WhiteClock "0:15:58"] [WhiteFideId "2090732"] 1.e4 e6 2.d4 d5 3.e5 c5 4.c3 Nc6 5.Nf3 Qb6 6.Bd3 {the Milner-Barry Gambit.} 6...cxd4 7.O-O {cxd4 is overwhelmingly played in the database, but the text move is favored by higher-rated players and scores a little better as well (around 50 percent). White gets on with development and gets the king to safety.} 7...Bd7 ( 7...dxc3 8.Nxc3 $14 {here White has three minor pieces developed to Black's one, good open lines for the bishops, and prospects of getting the queen to f3/g4/h5 for kingside pressure. Well worth the gambited pawn.} ) 8.Re1 {again we have a split between the heavily played database move (cxd4) and the text move favored by master-level players (and the engine). Here the rook overprotects the e5 pawn, freeing up the Nf3 to move.} 8...Nge7 9.h4 {a typical attacking move in these types of positions. White has been concentrating on development until now, but has no need to move the Bc1 given its beautiful scope on the kingside, and the Nb1 stays at home in case it needs to recapture on c3.} 9...a6 {by playing this, Black argues that her kingside defense is better off by leaving the pawns at home and flexible.} ( 9...h6 $5 {this is the most played, based on a small sample size. Black here chooses to context the g5 square and pay some attention to kingside defense.} ) 10.h5 {pressing ahead on the kingside. This rules out ...Ng6 and threatens further disruption to the pawn structure.} 10...h6 {physically blocking further advances of the h-pawn and taking control of g5.} 11.Qe2 {develops the queen to a square from where she protects the b-pawn, forms a battery on the f1-a6 diagonal, and reinforces the e-file.} 11...f5 {this appears to have been done in order to provoke White's next response, which leaves Black somewhat better off in objective terms. The engine assesses that White could have exploited the resulting pawn structure weakness with a more patient approach.} ( 11...dxc3 $5 12.bxc3 $10 {and White's pawn structure looks fragmented, but the c-pawn does a good job of covering the key b4 and d4 squares.} ( 12.Nxc3 $6 Qb4 $15 ) ) 12.exf6 {for reasons mentioned in the previous note, here the engine advocates developing the knight to a3 or d2, which gets it into thae game, as retaking with the pawn on c3 is fine for White.} 12...gxf6 13.cxd4 Nxd4 14.Nxd4 Qxd4 15.Be3 {the key moment in this sequence. Black's queen is exposed and needs to be careful, being faced with White's centralized bishop pair. Bailing out with ...Qb4 is possible, although the engine strongly favors ...Qh4, calculating that the queen cannot be trapped. In practical terms this would be difficult to play, of course. Black instead of the above chooses to keep her queen centralized, presumably wanting to keep using it in defense of the king. However, this gives White other opportunities.} 15...Qe5 $6 16.Nd2 $14 {simple but effective. White now gathers her forces for a push in the center and kingside, with the pieces cooperating well together. Meanwhile, Black's forces are disorganized and relatively undeveloped, with the pawn not enough material compensation for White's positional edge.} 16...Rg8 {developing the rook to a more effective file.} 17.f4 Qd6 18.Qf2 {forming an effective dark-square Q+B battery on the diagonal, with Bc5 and Bb6 now a possibility, and lining the queen up on the f-file against Black's weak f6 pawn.} 18...Rc8 {getting the other rook out to its best file.} 19.Rad1 {although this lines the rook up against the queen on the d-file, it seems to be more of a waiting move. Given that her opponent has no obvious plan at this point, this can be an effective strategic ploy, tempting her to go wrong...as she does on the next move.} 19...Bc6 $2 {now White has tactics involving the light-square bishop and a revealed pin on the d-pawn.} ( 19...f5 {is one option that would maintain the defense by blocking the b1-h7 diagonal and also the further advance of the f-pawn. Perhaps Black did not like the resulting dark square weaknesses, but these can be covered well enough by the Bf8. For example} 20.Nf3 Bg7 $10 ) 20.Bh7 $1 $18 Rg7 21.Ne4 {unleashing multiple threats which Black cannot parry.} 21...Qc7 22.Bb6 {this is a safe choice for consolidating the advantage.} ( 22.Nxf6+ Kf7 23.f5 {is a more devastating but complex route.} ) 22...dxe4 {essentially forced, getting some material back for the queen.} 23.Bxc7 Rxh7 24.Bd6 Rg7 {getting back to a useful file with potential counterplay. Black is no doubt hoping that the e-pawn plus more active pieces gives her a chance to catch her opponent out in a tactic later.} 25.Rc1 {White will be happy to exchange rooks on the c-file if Black allows it, consolidating the material advantage.} 25...Nf5 $6 {allowing the exchange of bishops, which reduces material and removes potential Black counterplay on the dark squares.} ( 25...f5 $5 {consolidating the pawn structure seems useful here.} ) 26.Bxf8 Kxf8 27.Rxe4 {taking advantage of the pinned Bc6.} 27...Rd8 28.Rxc6 {correctly simplifying the position further to a clear win.} 28...bxc6 29.Rxe6 {the material balance is now queen and pawn for rook and knight, which without counterplay is a win for White. Black tries a few more desperate moves, but has no threats left.} 29...Ng3 30.Rxf6+ Ke7 31.Qc5+ {an elegant way to consolidate the win, effectively using a tactic to trade off rooks.} ( 31.Rg6 {also works, but lets Black have more fun first.} 31...Rd1+ 32.Kh2 Rxg6 33.hxg6 Nf1+ 34.Kh3 Kf6 35.Qe2 $18 ) 31...Kxf6 32.Qe5+ Kf7 33.Qc7+ 1-0

05 March 2022

Computer resources: HIARCS Chess Explorer Pro

As a follow up to the Chess Computing Resources post, here I'll highlight the recent release (January 2022) of HIARCS Chess Explorer Pro (HCE for short). I was made aware of it in a blog post by NM Hans Schut, then decided to try it for myself, as a replacement for using ChessBase 15 (CB15). One of the key features is the program's ability to read (and convert) CB files to its own format, so it can genuinely replace the use of ChessBase without losing access to previous work.

I had been tired for a long time of ChessBase's long-standing annoying bugs and GUI limitations/quirks, but the final push to switch came when I was analyzing the last commentary game (Abrahamyan - Tokhirjonova from the 2021 US Women's Championship). A complicated, 66-move middlegame maneuvering struggle, this required more time than usual to go through, and during one analysis session the ChessBase window crashed and I lost over 2 hours of work. Most modern programs these days have an auto-save feature for just this reason, but unfortunately not ChessBase.

As with any new program, it took a little experimentation to get the HCE Pro GUI setup the way I wanted and figure out how to do things like set the chess engine parameters. For most of my chess analysis/study needs, I want to have visible:

  • A large board display
  • Notation window, where variations and notes are entered 
  • Engine analysis window
  • Reference database window
Here's what that looks like in HCE Pro. My current setup is Deep HCE Pro (allows up to 16 cores for engine analysis), Dragon by Komodo 2.6.1 engine, and for the reference database MegaBase 2020 converted to HCE format, with the packaged HCE MasterBase of recent games imported into it.


Compared with my setup in CB15:


In HCE Pro, the particular game I'm working on is copied into [Workbase], one of the included databases, which is designed for storing your current work and (very importantly) will autosave it. Once you're done with a game, it can simply be copied back into whatever database you want.

In general, I much prefer the HCE Pro setup, which gets everything I want on a single, clean-looking screen. (In the view menu, note that it uses the term "Explorer" to describe its main windows, which can be toggled on/off.)
  • As can be seen in the top screenshot, there is easily room for the reference tree window ("Tree Explorer") at the bottom right in HCE. In my previous CB15 setup, it's a separate tab in the notation window.
  • Adding "Book Explorer" will let you view either local or online book trees, which are easily selectable from the buttons on the window. I tend not to use this feature much, instead relying on the reference database and engine evaluation, but for others the book availability can be an important added feature for analysis.
  • Notes and variations in the notation are displayed more readably in HCE when paired with a large board, although I think CB15 does a better job of visually displaying multiple sub-variations in a unique way.
  • The engine window ("Analysis Explorer") has all the necessary information at a glance and you can adjust engine settings using the icons. However, version 1.0 has these setting adjustments as temporary only, so to save them for the next session, you'll need to go to Edit - Preferences - Engines and double-click on the engine name to permanently change its parameters.
  • The tabbed main window in HCE allows for easier switching between open databases. You can also toggle on/off the current database game list at the bottom of the screen ("Game Explorer").
  • The one quirk for me with HCE is that the board is on the left of the screen and the right side columns can't be further resized beyond what you see above; so if I want the board centered for my vision, I need to use the hack of physically moving my monitor over to the right. This is a relatively minor thing, however.
HCE has some other useful tools, which I may comment more on with further use. The "Evaluation Explorer" is a nice way to see the ups and downs of a game in a visual display. The long struggle of the last commentary game, for example, looks like this:


04 March 2022

Commentary: U.S. Women's Championship 2021, Round 1 (Abrahamyan - Tokhirjonova)

It's been a while since I've revisited this blog, due to the holiday period and various work commitments, although I've kept up a minimum level of chess practice with weekly training games and semi-daily sessions of tactics puzzles.

As I've done for some past cycles, for the next series of Commentary games I'll look at some of the most relevant games from the last U.S. Championship cycle, starting with the Women's event. This one features WGM Tatev Abrahamyan, who published an interesting series of improvement videos reviewed here, versus WGM Gulrukhbegim Tokhirjonova in the first round.

I selected the game because of the offbeat Caro-Kann variations employed by both White and Black, which have some widely applicable lessons regarding structure, opening development, and strategic choices. Black's main problem in the opening is her useless king's knight and more general lack of focus on development. White is able to seize the initiative and obtain a large space advantage by move 16, at which point strategically it looks almost hopeless for Black. 

Nevertheless, Black does not give up and puts up strong resistance, eventually being able to strike back and prevail in the long run, after a long middlegame struggle, as White is unable to find the most pressing continuations. This once again highlights the benefits of mental toughness and forcing your opponent to find a win by putting up a stubborn resistance. This often results in at least one chance appearing for successful counterplay - if you can find it.

One of the other repeated lessons from this game is the importance of changes in the relative strategic value of the pieces - on both sides. Black's aforementioned king's knight is a case in point, occasionally coming to life but often completely out of the game. However, White's bishops have some major shifts in power as well, and White passes up ideas (such as the Rd3-b3 rook lift) with the major pieces that would have significantly enhanced her position. The decision to trade minor pieces, or threaten a trade, is an often-overlooked aspect of chess strategy at the club level, as is the idea in general of relative piece power during a game. 


[Event "U.S. Women's Chess Championship 2021"] [Site "http://www.chessbomb.com"] [Date "2021.10.06"] [Round "1"] [White "Abrahamyan, Tatev"] [Black "Tokhirjonova, Gulrukhbegim"] [Result "0-1"] [WhiteElo "2344"] [BlackElo "2322"] [EventDate "2021.??.??"] [ECO "B10"] [PlyCount "132"] [Annotator "ChessAdmin/Dragon 2.6.1 by Komodo"] 
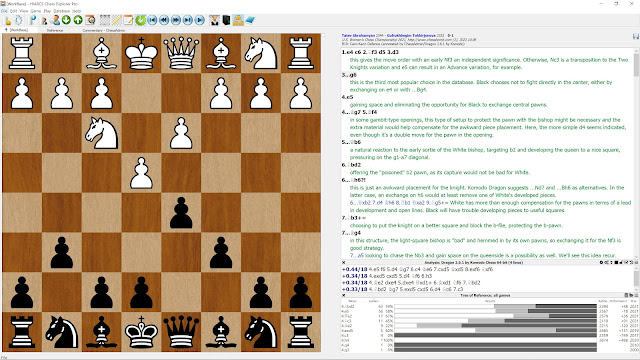
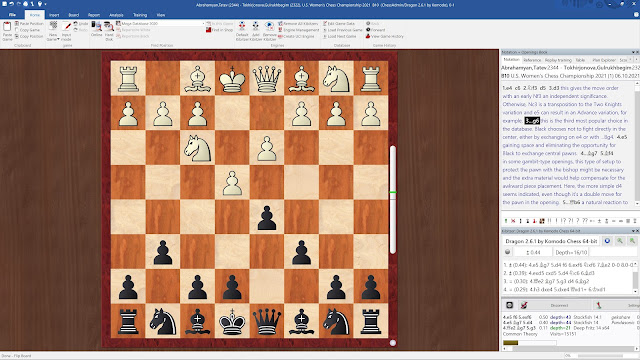
1.e4 c6 2.Nf3 d5 3.d3 {this gives the move order with an early Nf3 an independent significance. Otherwise, Nc3 is a transposition to the Two Knights variation and e5 can result in an Advance variation, for example.} 3...g6 {this is the third most popular choice in the database. Black chooses not to fight directly in the center, either by exchanging on e4 or with ...Bg4.} 4.e5 {gaining space and eliminating the opportunity for Black to exchange central pawns.} 4...Bg7 5.Bf4 {in some gambit-type openings, this type of setup to protect the pawn with the bishop might be necessary and the extra material would help compensate for the awkward piece placement. Here, the more simple d4 seems indicated, even though it's a double move for the pawn in the opening.} 5...Qb6 {a natural reaction to the early sortie of the White bishop, targeting b2 and developing the queen to a nice square, pressuring on the g1-a7 diagonal.} 6.Nbd2 {offering the "poisoned" b2 pawn, as its capture would not be bad for White.} 6...Nh6 $6 {this is just an awkward placement for the knight. Komodo Dragon suggests ...Nd7 and ...Bh6 as alternatives. In the latter case, an exchange on h6 would at least remove one of White's developed pieces.} ( 6...Qxb2 7.d4 Bh6 8.Rb1 Qxa2 9.Ng5 $14 {White has more than enough compensation for the pawns in terms of a lead in development and open lines. Black will have trouble developing pieces to useful squares.} ) 7.Nb3 $14 {choosing to put the knight on a better square and block the b-file, protecting the b-pawn.} 7...Bg4 {in this structure, the light-square bishop is "bad" and hemmed in by its own pawns, so exchanging it for the Nf3 is good strategy.} ( 7...a5 {looking to chase the Nb3 and gain space on the queenside is a possibility as well. We'll see this idea recur.} ) 8.h3 Bxf3 9.Qxf3 Nd7 {Black again passes up the idea of ...a5 in favor of piece development.} 10.d4 {White consolidates the center, supporting e5 and also fighting for control of c5.} 10...e6 {solid but a little passive. One thing to note is that the ...c5 break is eventually possible, now that the d5 pawn protected.} ( 10...a5 $5 {the engines like this (previously seen) idea here, which helps fight for c5 if White allows Black to chase away the Nb3, or weakens White's queenside if the a-pawn goes to a4 to block Black's advance.} ) 11.g4 {now that the center is locked, this kind of thrust on the wing is strategically sound.} ( 11.Bd3 $5 {is a less commital alternative, developing a piece and keeping White's options open.} ) 11...Ng8 {correctly retreating the knight, but also highlighting its lack of utility from the start on h6.} 12.h4 {with the knight now out of the way, White lacks good targets for the pawn advance, so developing (or redeveloping) a piece might have been more useful.} 12...f6 {a thematic pawn break, also seen in French Defense type positions. Black's pressure challenges the head of White's pawn chain on e5. It also reactivates the Bg7. At the same time, however, e6 is weakened and the f-file will soon be opened.} 13.O-O-O {this is not a bad move, but it's not necessary, either. White's king is no worse off in the center at this point.} ( 13.exf6 Ngxf6 14.h5 ( 14.g5 Ne4 $10 ) 14...a5 {and Black has more or less equalized, certainly with a more active game than before.} ) 13...fxe5 14.dxe5 c5 $6 ( 14...Ne7 {instead gets the knight to a useful square and allows the rook to go to f8.} ) ( 14...Bxe5 $2 {would be a mistake and ...Nxe5 has similar problems. The pawn looks like it is not defended adequately, but after} 15.Bxe5 Nxe5 16.Qe2 $18 {the queen's pressure down the e-file can't be countered - if ...Qc7, then Re1 - so the e-pawn will fall.} ) 15.h5 $16 {White now presses the advantage on the kingside, where Black cannot afford to open additional lines to the king.} 15...O-O-O $6 {this gets the king out of the way, but allows White a dominating space advantage.} ( 15...Nh6 {ironically seems better, by physically preventing the h-pawn advance, although a human player probably would not consider moving the piece back after such a humiliating sequence.} ) 16.h6 $18 Bf8 17.c4 {this is a master-level move that might not be considered by a club player, given the apparent weakening of the pawn shield in front of the White king. However, Black has no way of taking advantage of this supposed weakness. The move helps White's worst piece, the Bf1, become relevant; directly challenges Black's center; and gains space on the queenside (b5). White would be very happy if the pawn sacrifice were to be accepted.} 17...d4 ( 17...dxc4 $2 18.Bxc4 $18 {and White's last piece gets developed to an outstanding square, pressuring the weak e6 pawn.} ) 18.Bg2 {the Q+B battery on the long diagonal, threatening b7, looks menacing but is not yet a knockout.} 18...Be7 {this clears the square for the rook, but also blocks the problem knight from developing.} 19.Kb1 {this doesn't appear necessary, but perhaps White preferred to play a waiting move, to see what her opponent would do next.} 19...Rf8 {without much to do on the d-file, the rook swings over to the f-file. The bishop is temporarily pinned and rook eyes the weak f2 pawn.} 20.Qe4 {maintaining the Q+B battery but limiting the queen's potential scope.} ( 20.Qg3 $5 {would overprotect the e5 pawn and guard f2, while leaving the queen a bit freer.} ) 20...Bd8 {As sometimes happens when defending an inferior position, Black's plan is rather obvious and straightforward: improve your worst pieces and hope White cannot find a breakthrough.} 21.Bg3 {a logical retreat, protecting f2 and freeing up the Qe4 to move rather than be tied to protecting the bishop on f4.} 21...Bc7 {the bishop is doing more here than on e7, pressuring e5 and freeing up the square for the knight.} 22.f4 {gaining more space and protecting the e5 pawn.} 22...Ne7 {the knight finally gets off its original square again.} 23.Nc1 {White looks to redevelop her own knight to a better square.} ( 23.Rd3 $5 ) 23...Nc6 {here the knight is quite useful, with b4 and a5 available and adding to the pressure on e5. This restrains White from further advancing the f-pawn.} 24.Nd3 {not a bad move for the knight, but unfortunately for White it takes away the idea of the rook lift Rd3-b3, which would significantly strengthen the rook and White's queenside.} ( 24.Rd3 ) 24...Na5 $6 {after White's obvious next move, which gives her rook something more to do than sitting on d1, this knight is just stuck on the queenside rim and will have to go back.} 25.Rc1 Rhg8 {developing the rook behind the g-pawn. Not much else going on for Black.} 26.Bh2 {this seems like more of a waste of a tempo than anything. Perhaps White again wanted to play a waiting move.} ( 26.Rhf1 ) 26...Nc6 27.Bh3 {lining up on the e6 pawn, in the event of g4-g5. Better mobilizing one of her major pieces with Rhf1 or Qe2 is suggested by the engine.} 27...Ne7 {the knight's journey continues, perhaps lacking anything obviously better to do.} 28.Rhf1 a5 {working on initiating some queenside counterplay, gaining space and thinking about disrupting White's king position with further advances.} 29.Rf2 {this reinforces b2 and clears f1 for the other rook to potentially double on the f-file. However, it seems rather passive.} 29...Rf7 {clearing f8 for the other rook.} ( 29...a4 $5 {continuing with the idea of counterplay would seem more active.} ) 30.Bg3 {and now the bishop goes back, with the intent of transferring to h4, but begging the question of what it was doing on h2 before.} 30...Rgf8 31.Bh4 Kb8 32.Bg3 $16 {now this really is a wasted maneuver and White is giving Black additional time to reorganize.} ( 32.Bxe7 ) 32...Ka7 33.Re2 $2 ( 33.Bg2 ) 33...Ng8 $2 $18 {Black returns the favor with yet another time-wasting maneuver of the king's knight. Instead, there was now a tactical opportunity for a breakthrough and counterplay on the kingside, based on the fact that White has given up control of f3. Psychologically, however, it would be difficult to find, given that Black has spent all game with the mental assessment/assumption that White was dominating on that side of the board.} ( 33...g5 $1 34.Rf1 ( 34.fxg5 Rf3 35.Rg1 Ng6 $10 {Black will regain the pawn with at least an equal game.} ) 34...gxf4 35.Rxf4 Rxf4 36.Bxf4 Ng6 {and Black is close to equalizing, with a much freer game.} ) 34.Ne1 $2 {ignoring the hanging h-pawn. White will still be positionally better, but now Black has compensation in the extra material and in getting rid of the advanced, cramping h-pawn.} ( 34.g5 $1 {would lock up White's kingside space advantage and open up the h3-e6 diagonal for the bishop.} ) 34...Nxh6 $10 35.Nf3 {heading for g5 next, but this could be easily handled by Black.} 35...Ng8 $6 {this is unnecessary and (again) reduces the utility of the knight. From h6, it watches the g4 pawn and would prevent the Bh3 from going to g2, which it soon does. And if g4-g5, the knight would have an outstanding square on f5 to go to.} ( 35...Bd8 {and the bishop, which has such limited scope, would gladly trade on g5, effectively preventing the knight from landing there.} ) 36.Ng5 Re7 ( 36...Rg7 $5 {would leave open the e7 square for the knight.} ) 37.Bg2 {clearly an improvement of the bishop's power, also re-establishing the Q+B battery on the long diagonal, which Black must watch. If White could achieve a rook lift to b3, then Black would be much worse due to the weakness at b7, but this takes some time to achieve.} 37...Nb8 {presumably Black at this point had no better ideas. However, simply playing the knight back to h6 would be something useful. The text move actually makes it more difficult for Black to defend on the queenside, as it makes b7 more vulnerable.} 38.Rh1 {this mostly just wastes time for White, since Black can easily meet the threat on the h-file.} ( 38.Rd2 $5 {heading for the rook lift.} ) 38...h6 39.Nf3 Rg7 {protecting the g6 pawn.} 40.Nh4 Ne7 $10 {once again Black easily defends and White has to reset.} 41.Nf3 Ng8 $6 {inviting a move repetition, but now White hits on the rook lift plan.} ( 41...Nbc6 $5 {is the engine's suggestion, giving up the h-pawn for counterplay on the queenside. For example} 42.Rd2 Qa6 43.Rxh6 Qxc4 $10 ) 42.Rd2 $16 Bd8 $6 {this had more of a point to it earlier, when White's knight was eyeing g5. Now, it effectively ignores White's growing threat on the queenside.} ( 42...Qa6 ) 43.Rd3 Qc6 44.Qe2 {naturally White avoids exchanging queens, which would considerably reduce her attack and also bring out the Nb8. Note how both of Black's knights are on their original squares.} 44...Qe8 {getting the queen off the long diagonal and clearing c6 for the knight.} 45.Nd2 {opening things up for the Bg2 and heading for the excellent post on e4.} 45...Nc6 46.Ne4 $18 {now the pressure is on again against Black in the center, along the long diagonal, and up the b-file. Meanwhile, Black's pieces are all clustered on the back ranks and not coordinating with each other.} 46...Be7 47.Rb3 h5 {a desperate attempt at distracting counterplay.} 48.Rb5 {this retains a significant advantage, but the engine recommends simply playing g5, which locks down the kingside and prevents any thought of counterplay there.} 48...h4 49.Bxh4 {a simple and effective response.} 49...Bxh4 50.Rxh4 Rxf4 51.Nxc5 {White is now effectively breaking through on the queenside and Black's king is vulnerable, while White's remains safe and Black's activity on the kingside is not a real threat.} 51...Rgf7 {the rook is effectively trapped here, but temporarily makes the "threat" of going to f2 - although White can simply ignore this, due to a tactic on the vulnerable b7 square. Instead, White chooses to retreat her very strong attacking knight and cash it in for material advantage (the exchange). She's still winning, but afterwards how to proceed is not so evident, and there are fewer tactics available.} 52.Nd3 ( 52.Rh3 {may be the simplest approach.} 52...Rf2 53.Rxb7+ Ka8 ( 53...Rxb7 54.Qxf2 Rf7 55.Bxc6 Rxf2 56.Bxe8 $18 ) 54.Qe4 Rxb7 55.Qxc6 Qxc6 56.Bxc6 Rxb2+ 57.Kc1 Rb1+ 58.Kc2 $18 {Black will run out of checks and White will win decisive material.} ) 52...Nge7 53.Nxf4 Rxf4 54.Rh3 {correctly activating the rook on the 3rd rank, where it can go to b3 or a3 and restrain ...d3.} 54...g5 {more desperate hopes for counterplay.} 55.Rhb3 Qg6+ {at least the queen is finally doing something.} 56.Ka1 Nd8 {Black is now busted, with b7 about to fall, but White does not play any of the crushing moves, with Bxb7 probably the simplest.} 57.Qd2 $6 ( 57.Bxb7 {with the threat of Rxa5+, so Black will lose the queen or get mated.} 57...Kb8 58.Be4+ ) 57...Nec6 {the correct but still desperate defense.} 58.Rxa5+ Kb8 59.Rab5 Qf7 {threatening a cheapo mate on f1. White fails to defend properly against it, giving the king an out rather than controlling the mating square. Time pressure may have been a factor, one imagines.} 60.a3 $2 ( 60.Qd1 {or any other queen move keeping control of f1 works.} ) 60...Rf2 $1 {the loose bishop and White's misplaced queen now combine in a tactic for Black. White now fails to find the drawing continuation.} 61.Qxg5 $2 ( 61.Rxb7+ Nxb7 62.Rxb7+ Kxb7 63.Qb4+ Kc8 64.Bxc6 $10 ) 61...Rxg2 $19 {suddenly it's now White's king that is vulnerable and Black's pieces that are effectively coordinating. The two knights can defend in the absence of the Bg2 and the Q+R can penetrate on the first rank.} 62.Ka2 Rg1 63.Qf6 Qh7 {amazingly, White cannot defend herself now, the main culprit being the b2 pawn walling the rooks off.} 64.Rf3 Qb1+ 65.Kb3 d3 {Nimzovich would have been proud. Passed pawns must be pushed!} 66.Qf8 d2 {White can now pick up the d-pawn, but Black is still by far winning, given White's vulnerable king.} 0-1